Beauty/Body Recipes, Tips & Tricks, Uncategorized

Homemade Beautyberry Mosquito Repellant


I recently saw a meme that said “Fall in Florida – It’s like summer but with pumpkins” and it’s SO true lol. Unfortunately, this means that we are still dealing with those pesky mosquitoes. My youngest kiddo must be extra sweet to them because they always go after her more than the rest of us. But since trying this Beautyberry repellant recipe she has not had ONE bite, I am amazed!

The leaves of the beautyberry plant are said to be at least as effective as Deet for repelling mosquitoes and even ticks. It will need to be reapplied every 2-3 hours, please test a small area of your skin first to make sure you will not have a reaction before spraying it over your body. This plant is found in the SE of the USA, there are beautyberries all over NE Florida where we live. If you don’t have this plant or can’t find any nearby, you can order some here: Beautyberry Plant – One Gallon Pot. They grow well in USDA zones 7-11 and they can be easily propagated from cuttings, so if you order one plant you can easily make more! I have a row of them along one of my fences now, you can see my Instagram post on that HERE if you’d like. You can also use the berries to make jelly, add to bread or muffins, etc. You can find more information about growing them HERE.

To make the repellant you will need lots of leaves, I collected a large bowl full. I didn’t weigh or measure in any way, but it was at least a few handfuls. I actually harvested entire branches, removed the leaves, cut into pieces that had a few nodes each, and stuck them in moist potting soil to grow more plants. After only a few days they already have new growth.

Beautyberry Mosquito Repellant Recipe:

Wash the beautyberry leaves you gathered and cut them into strips.

Fill any size mason jar with the leaf strips.

Pour boiling water over leaf strips and fill jar.

Let sit overnight, then strain.

Pour into spray bottle and store in fridge to extend shelf life.

*Warning* – Do NOT drink. Please label properly and keep out of the reach of children.

Enjoy!

❤ Ashley

Beauty/Body Recipes, Tips & Tricks

Homemade Makeup Primer (and happy Spring!)


Homemade Makeup Primer ~ Ashley's Homemade Adventures

This homemade makeup primer has only 2 ingredients, it couldn’t be more simple and it’s so cheap to make! I have been using it for a few weeks now and I am loving it.

This is going to sound really weird but I was using this anti-chaffing gel as a primer for years. I can’t remember where I saw it but someone had suggested it as a cheaper alternative to this Smashbox primer. It actually works great, although I can’t say if it compares to the Smashbox primer since I never tried that. Still, I wanted to try to make something that has better ingredients and to save even more money.

I have seen other primer recipes that say to mix your foundation with moisturizer but I wanted to try to make something similar to the gel I had been using for a long time. I already had a small bottle of aloe gel I picked up at the dollar store. We live in Florida and I burn easily so it’s a must have! I grabbed that and went to the kitchen to experiment, this is what I ended up with.

Homemade Makeup Primer ~ Ashley's Homemade Adventures

Homemade Makeup Primer:

1 Tablespoon Aloe Gel

1 Teaspoon Cornstarch

Simply mix together until combined, and store covered so it won’t dry out. Apply to clean skin and let dry before applying foundation.

I wanted to use arrowroot powder but I’m currently out, more people will probably have cornstarch in their kitchen anyways. If you try the arrowroot powder version please let me know how it turns out in the comments. It has always worked perfectly in place of cornstarch in other things I have made. Either way, this costs only pennies to make!

I think this is a great amount to start with to see if you like it. If you want to make a bigger batch then simply increase the aloe gel to 1/4 cup and the arrowroot powder to 1 tablespoon.

I hope you enjoy this and that it will help save you money! If you try it, please let me know how you like it. If you have any ideas on improving it, I would love to hear those also.

Since it’s finally spring, I just wanted to share some pictures with you guys! This is probably my favorite time of year here in NE Florida. The weather is gorgeous! (as I am writing this, it’s in the 70’s with blue skies – perfect!) I already have some peas in the garden and some other baby plants in pots (Tomato, basil, melon, etc.) I absolutely love working in the garden, even if I pay for it later lol. We have lots of wildflowers blooming and it’s just a beautiful time of year with the new growth. I hope these will bring a smile to your face, especially if you are still dealing with winter weather where you live.

❤ Ashley

Beauty/Body Recipes, Tips & Tricks

Homemade “Vaseline”/ All Natural Non-Petroleum Jelly


Homemade "Vaseline"/ All Natural Non-Petroleum Jelly ~ Ashley's Homemade Adventures

I was inspired to make this because my husband’s hands are so dry and cracked this winter. Coconut oil healed the little cuts, but his skin is still super dry. He doesn’t just need a moisturizer, he needs something to protect his skin as well. What would most people turn to in that situation? Good ole petroleum jelly. Problem is, I don’t have any and haven’t for a long time. When I read about some of the dangers I threw it out. It can easily be contaminated and is a possible carcinogen. Cancer causing slop? No thank you! I don’t want that stuff anywhere near my family ever again. On top of that it does not even moisturize at all and can actually prevent your skin from getting rid of toxins. It is even banned in some other countries! It is amazing how many products I used to use all the time without even thinking about WHAT I was using, and many other people are the same way. Of course now I am always checking labels lol. Anyways I knew there had to be a better way, and luckily I found one! This recipe is for homemade non-petroleum jelly. I was even able to simplify it a little more and make mine totally organic! It could not be any easier 🙂

Ingredients:

  • 1/8 cup (about 1 ounce) beeswax (I used organic beeswax pastilles)
  • 1/2 cup olive oil (I used organic olive oil)

Pour your ingredients into the same jar you are going to be using to store it. Place the jar into a saucepan and add enough water to go about halfway up the jar. Heat on medium until the beeswax melts. Stir, and carefully remove jar from pan – I am sure it goes without saying but just in case, it is HOT. Let cool completely, store covered.

I loved using the same jar to store it in, because there was no clean up afterwards! I always have popsicle sticks on hand because we love to make our own, so I used one of those to stir. Literally the only thing I had to do was dump the water after I was done. You could even let it cool completely and use it to water your plants. It only takes a few minutes for the beeswax to melt so keep an eye on it. I would not recommend boiling the water because the jar might tip and spill. This only fills a small jar so if you want to make a large amount use a bigger jar and double the ingredients.

I actually made two jars of it, and while one was cooling I stirred some essential oils into it to make a natural antiseptic ointment. I used about 10-20 drops each of lavender, lemon and tea tree essential oils. I will probably also use this as a base for homemade vapor rub with some eucalyptus, peppermint and lavender essential oils. Any one of these would make a great gift too!

Homemade Petroleum Jelly & Antiseptic Ointment ~ Ashley's Homemade Adventures

Enjoy!

❤ Ashley

*Edited on 04/04/19 to add: I now use 1/4 cup olive oil and 1/4 cup coconut oil to make this. I find the consistency is better and coconut oil is great for healing

Beauty/Body Recipes, Uncategorized

Homemade Shaving Lotion


Homemade Shaving Lotion ~ Ashley's Homemade Adventures

Finally an alternative to store-bought shaving cream! I have tried using plain soap or body wash (can we say razor burn?!) and also plain conditioner (worked fine but not silky enough for me) So yes I will admit I was still using store-bought, but now I can kiss it goodbye! I was using lotionized shave creme, but looking at the label makes me cringe. Sulfates, parabens, and a whole bunch of other crap I can’t even pronounce. I am so glad this homemade shaving lotion can be made without all that! Not to mention it works great and leaves your skin feeling silky smooth.

I found this recipe here but I did modify it a bit to make it more natural 🙂

Ingredients:

  • 1 cup shampoo (I used 1 cup of my homemade liquid castile soap)
  • 1 cup conditioner (I used Simply U sulfate and paraben free conditioner)
  • 5 tablespoons baby oil (I used grape seed oil)
  • 5 tablespoons lotion (I used 1/2 cup of St. Ives with natural moisturizers, but I plan on using homemade lotion in the future)
  • Essential oils (optional, I did not use any in this batch but probably will in the future)

Wisk all ingredients together, pour into a bottle and you are done! I am absolutely in love with this stuff and never plan on buying any chemical laden shaving cream from the store again! I store mine in a pump bottle, which makes it super convenient. Enjoy!

I will leave you with this bonus tip… Dry your razor blades off when you get out of the shower. They will last longer, seriously! 🙂

❤ Ashley

Beauty/Body Recipes, Drinks, Tips & Tricks

Homemade Electrolyte Drink (Homemade Pedialyte)


Homemade Pedialyte Recipe - Ashley's Homemade Adventures

The flu is going around like crazy! We have been dealing with it in our house for several weeks now. My daughter and I are past the worst part now, thank God! There was one day we were both very weak with very high fevers. I was so happy I had made some of this homemade Pedialyte the day before. This is a great way to save yourself some money and a trip to the store. You can also flavor this any way you want! I know there are quite a few recipes out there but this is how we do it:

Homemade Pedialyte:

  • 8 cups water (I prefer to use distilled water, I always have some on hand)
  • 1/4 cup honey (you can also use sugar but we try to stay away from extra sugar and the honey has added benefits)
  • 1 teaspoon SEA salt (contains important minerals that table salt does not, you could also use Himalayan salt which would be even better)
  • Juice of an orange, lemon or lime (optional but has even more benefits, like Vitamin C)
  • Crystal Light or Kool-aid powder for flavor (also optional, we love the lemon Crystal Light with Stevia)

Combine all ingredients in a pitcher, stir until salt and honey have dissolved. Store in refrigerator.

We also love to make this into popsicles, great for when you or your child is burning up from a fever. When my daughter is sick I make sure she takes a sip of this every 10 minutes or so. Best served chilled.

Warning: Honey is not considered safe for children less than a year old.

~~~~~~~~~~~~~~~~~~~~~~~~~~~~~~~~~~~~~~~~~~~~~~~~~~~~~~~~~~~~~~~~

Also a quick update on my cousin Joe… (I mentioned in the First Birthday post about how he had a massive heart attack) Miraculously he has no serious brain damage, his heart is working on its own and it looks like he will be okay! He still has to get through heart surgery on Thursday so he is a long way from full recovery, but I am just so happy and thankful he is still with us. If anyone could send some positive thoughts or prayers his way I would really appreciate it 🙂

Beauty/Body Recipes, Cleaning Recipes, Tips & Tricks, Uncategorized

Homemade Liquid Castile Soap


I love Dr. Bronner’s liquid castile soap, the only problem is that when you use as much castile soap as I do the price can add up. I heard of Kirk’s castle bar soap so I bought it to use in the shower. I really loved it and it is super cheap compared to other soaps. It’s all natural and made with coconut oil, but it does not smell like coconut.  I found it in the regular soap aisle at Wal-Mart, you can also order it here: Kirk’s Castile Soap

I have made liquid hand soap out of other bars of soap before, so I figured I could make this into liquid castile soap like Dr. Bronner’s. 

I ended up with a nice liquid soap, but very thin. I was actually a little disappointed and thought that I had watered it down too much, until I used it. It was still very sudsy and effective! You could use less water if you wanted it thicker but for me this works just fine. Here are some of the ways that we use it around our house:

Face/body wash in the shower (add baking soda for a great exfoliating wash)

Hand soap (in a regular pump bottle or about 1/4 soap to 3/4 water in a foaming dispenser)

In place of Dr. Bronner’s in my homemade shampoo (I double the amount for this)

To clean fruits and veggies from the store (to remove germs and pesticide residue if you buy conventionally grown produce)

In place of Dr. Bronner’s for cleaning (Diluted with hot water for mopping the floor, cleaning the walls, cabinets, etc.)

Bathing pets

Pest control in the garden (Drop bugs into a bucket of hot soapy water)


Homemade Liquid Castile Soap:

1. Grate 1 bar of Kirk’s castile bar soap into large pot or container.

2. Add 10 cups hot water, stir until soap dissolves.

3. Store covered. (I use empty gallon-size water jugs and shake gently before use)

Update – This liquid soap seems to thicken or gel up when cold, store in a warm area of your house and it should remain liquid. 

I really love this stuff and you can’t beat the price. Little changes like this can make a big difference in your budget and eliminating toxic chemicals from your life. It takes hardly any time at all to make, it is cheap, all natural and works wonderfully. If you can think of any other uses for this please feel free to share in the comments. Enjoy!

❤ Ashley


Beauty/Body Recipes, Tips & Tricks, Uncategorized

Texas Here We Come!


I apologize for not posting anything lately, my daughter and I have a vacation coming up and I have been preparing for that. We will be in Texas for a couple of weeks visiting family. Of course I will post some pictures when we get back 🙂

I just wanted to share something with you all before we go. I keep finding more reasons to love coconut oil. I have heard that a lot of people use it on their hair like a homemade hot oil treatment, so today I decided to give it a try. I am really surprised at how soft it made my hair after one treatment, my ends are so smooth and shiny too 🙂 All I did was melt it in the microwave, ran it through my hair, covered with a shower cap and left it on for about an hour. I had to wash my hair 3 times to get it all out, but I used  A LOT. Then I just used my conditioner like normal. This is the result: (All I did was dry my hair with a round brush, there is no product at all in my hair)

I wish I would have taken a before picture, but honestly I didn’t think I would be so pleased with the results. Sorry about the quality, my cameras are charging so this is from my phone. I would definitely recommend trying this if your hair is dry or frizzy from coloring it.

Hopefully I will have some of my Gramma’s homemade recipes to share when I get back! I hope everyone enjoys their spring break!

❤ Ashley


Beauty/Body Recipes

Homemade Facial Toner


This homemade toner has only 3 ingredients and takes hardly any time to make. It smells fantastic and is great for your skin, what is not to love? It would also be very easy to adjust to your own personal preferences. You will only need:

  • 1 cup green tea, cooled to room temperature
  • 1/4 cup witch hazel
  • 10 drops lavender essential oil ~ optional but has added benefits for your skin

Place 1-2 tea bags into a cup or bowl, pour one cup of hot water over tea bags. Let steep until water has reached room temperature, discard tea bag. Stir in witch hazel, pour into storage bottle. Add essential oil and give it a good shake. So easy and so good for your skin! I used jasmine green tea, so it has an extra floral-y scent. (I don’t think floral-y is a word but you know what I mean, right?) 🙂 Green tea has amazing antioxidant and anti-inflammatory benefits, witch hazel gently cleanses the skin, and lavender essential oil is also anti-inflammatory, anti-septic and anti-fungal. You could also use tea tree oil in place of the lavender but the lavender smells much better in my humble opinion. Apply with a cotton ball after washing your face and do not rinse. You could also store this in a spray bottle and lightly mist your face, be careful not to get it into your eyes. If you have problems with acne on other parts of your body, like your back, you could spray it onto your back. I have been using homemade toner for a few months now and have seen a big difference with my complexion.  Use regularly and enjoy!

❤ Ashley


P.S. I am very excited because on March 6th my daughter and I are going to visit family in Texas for two weeks!! 🙂 Thank you tax return lol. Also this is just a random picture I wanted to share, one of my flowers from Valentine’s Day ❤


Beauty/Body Recipes

Homemade Shampoo


I have tried so many recipes for homemade shampoo. I am going to share a little bit of my experiences with you, then let you in on my shampoo recipe. This is probably going to be a pretty long post, but please bear with me… you will learn a lot I promise 🙂 After reading about the chemicals in store-bought shampoo I was determined to find an alternative.

When I first started researching going “poo free” as they call it. I heard about using baking soda and vinegar. I wasn’t quite ready to make that dramatic of a switch, so I started off with Crunchy Betty’s “Sorta Poo”  (I love her blog btw!) Now I absolutely LOVED how this stuff made my hair look and smell. It was heavenly! It is made with castile soap and coconut milk. There were 2 downsides though…. One my hair felt like it had a little bit of a residue but that could have been from the coconut milk I was using. Two you have to make a new batch each time you shower, or store it in the fridge. A few times I forgot to make it, or didn’t have time so I had to reach for the store-bought shampoo as back up. So I decided to make it ahead of time and store it in the fridge. A few times I jumped in the shower only to remember my shampoo was in the fridge, not fun. It also is REALLY cold when you do it that way, my 4-year-old was not a fan of really cold shampoo lol. So I decided that it just wasn’t working for me. But if you have castile soap you should really try this at least once, your hair will look amazing! If you do try it, I would not recommend using peppermint castile soap, unless you like a really strong tingly feeling.

So after sadly giving up my “sorta poo” I decided I was ready to try “no poo”. This is by far the best information I found on “no poo”. I loved how cheap and easy this was, and you don’t have to store it in the fridge. You wash your hair with baking soda, and use an apple cider vinegar afterwards to soften your hair. It was fantastic for my daughter’s hair, and for my roots. The problem with this for me was… my hair has been processed so many times. There is no pretty way to put it, its fried! lol. So unfortunately this just did not work for me either. My ends needed a little more lovin! I am in the process of growing my natural hair out now, so maybe I can go back to this one day 🙂 I have also seen people complain about their hair not smelling yummy like with regular shampoo and conditioner, which is true. But to fix that all you have to do is spray your favorite body spray on your brush when you brush your hair, problem solved!

So after experimenting a little bit I finally came up with my own homemade shampoo recipe. I am extremely excited to share it, because well it’s just awesome! lol. It leaves you hair clean, smelling good and really shiny. Best of all NO chemicals!  🙂 It also does lather a little bit unlike the “no poo” method. I read that chamomile tea was a natural way to gradually lighten your hair (if it is naturally fair to begin with) I am not sure if this is true but it got my mind going. So I thought… I will take the castile soap from the “sorta poo” and the baking soda from the “no poo”, use tea instead of water and add in some essential oils. But then it got even better! I had bought some xanthan gum for a conditioner recipe I tried out so I added that as well. I was amazed with the results and I am happy to share. So you will need:

  • 1 gallon of brewed tea or water
  • 1/2 cup baking soda
  • 1/4 cup castile soap
  • 3 tsp xanthan gum
  • essential oils (about 30 drops-optional)

For the shampoo I made this time I used regular black tea, almond castile soap, and tea tree oil. If you have never heard of xanthan gum don’t worry, I found it at Wal-Mart in the baking aisle. If you can’t find it at any stores there is always Amazon! A little goes a long way, and you can use it for gluten-free baking too. You can buy castile soap at Target, Whole Foods, GNC. It is also a little pricey up front (This bottle was 4-5 dollars) but you can use it for SO many things. I use it in my all-purpose cleaner, you can use it to wash your dog, car, walls, etc. It really is amazing stuff. You can also make your own liquid castile soap from the bars which is cheaper. Find my recipe for that here 🙂

(Updated to add: You can find Dr. Bronners HERE. Essential oils HERE, and Xanthan Gum HERE)

So first, brew your tea. I put the tea bags right into the cold water, then heat the water just to where it’s steaming and you see little bubbles on the bottom. Then I take it off the heat and let the tea steep for about 5-10 mins.

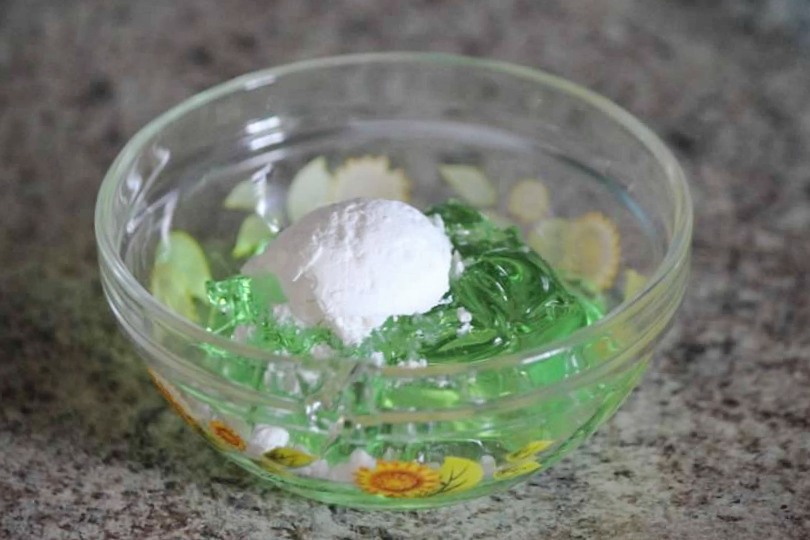
Next, remove the tea bags and stir in your baking soda. It will fizz up for a minute like this:

At this point you can let it cool off some before adding in the rest of the ingredients if you would like. You will want to whisk in your xanthan gum next, a little at a time. Then stir in your castile soap and essential oil. I keep forgetting to add the xanthan gum before the castile soap, silly me. So I ended up with a foamy top on my mixture while stirring in the xanthan gum. Not a big deal except it causes little clumps and its hard to see when it’s all mixed in. It doesn’t affect the end result, its just a little bit of a pain. This is what happened to me, lol.

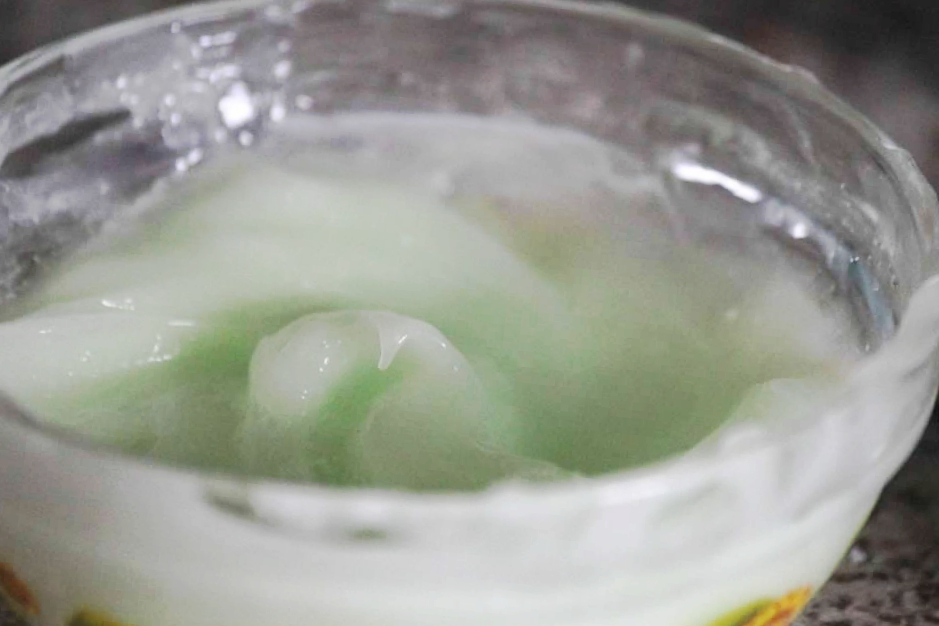
Here is what it will look like when its done. I had little clumps because of my oopsie, but they mostly dissolve anyways so its nothing to worry about.

After it cools completely stir in your essential oil then just pour some into an empty bottle for the shower and store the rest under the sink in an old milk or water jug. Use just like regular shampoo, and enjoy your clean, pretty smelling, shiny hair 🙂 There are so many variations you could do with this as well. The first batch I made was chamomile tea, with lavender castile soap and lavender essential oil. You could also do green tea, with citrus castile soap and lemon essential oil, or coffee with almond, etc.

I am still trying to find a conditioner recipe that I am happy with, so for now I am using a sulfate and paraben free kind called “Simply U Conditioner” (Color Shine formula) along with this shampoo.

Please please please try this and let me know what you think! I hope you will love it as much as we do.

❤ Ashley

(Please check out Homemade Shampoo Part Two for answers to some frequently asked questions and a recipe for a slightly thicker formula)

Beauty/Body Recipes

Homemade Deodorant


After reading some of the amazing benefits of coconut oil I just HAD to go out and buy a jar of it. Then I had to learn what to do with it, lol. While searching for uses of coconut oil, one thing I found was this recipe for homemade deodorant. I thought it was brilliant and had to try it. Immediately I rushed into the kitchen with my supplies and made a batch. I have not used regular store bought deodorant since. By making your own deodorant you are not exposing yourself to potentially harmful chemicals (like aluminum which may be linked to breast cancer) and its good for your skin as well. This is what you will need:

5 Tablespoons coconut oil (I used Spring Valley extra virgin coconut oil found in the vitamin section at Walmart)

1/4 Cup of baking soda

1/4 Cup of arrowroot powder or cornstarch (I used cornstarch)

10-15 drops essential oils (completely optional – I used mostly lavender with a hint of eucalyptus)

In a bowl, mix together the baking soda and cornstarch. Then add coconut oil and essential oils and stir together to make a paste. Simple right?! Then you can either spoon it into an empty deodorant container, or a container with a lid. This recipe made enough for me to fill a regular size deodorant container, a travel size deodorant container and a condiment container.

There are a few things you should know before making this. Coconut oil starts to melt at 76 degrees, so if you live in a warm place you might want to store your homemade deodorant in the fridge. It also melts a little while applying onto your skin. I have found the old deodorant containers to be a little messy while applying. You might end up with too much because of the melting. I much prefer scooping a little bit out of the small container with my fingers and applying it that way. Also it does not make your armpits smell good like regular deodorant, they will just not smell, like anything. It is very effective in preventing odor. The baking soda may irritate some people, although I have had no problem with it. If any of these things concern you, there are many other recipes readily available on the internet. This is the only one that I have tried so far, but it works for me.

So this may not be for everyone, but if you are brave enough to try it please let me know what you think! 🙂

❤ Ashley