Introduction

Update on Ashley ~ Ashley’s Homemade Adventures


Hello Everyone.

I know I posted that I would be back with more recipes soon, and it has not happened yet… I feel bad about that, but there is a very good reason. I was diagnosed with an uncommon disease, parathyroid disease AKA hyperparathyroidism. I would really like to spread awareness and tell you all about what it has been like for me.

When I was pregnant in 2013, I felt horrible. Way worse than my previous pregnancy. I had NO energy and so many things made me sick. I also found out that I had several kidney stones in both kidneys. Feeling like crap just happens to some women while pregnant, and kidney stones can develop in pregnancy as well so I did not think much of it. After having our second daughter I was not feeling better. I was not throwing up all the time, but I was still “I feel like I have been hit by a bus” tired. I was feeling very emotional, depressed and my anxiety was worse than ever. Fearing this was postpartum depression I told my doctor and she put me on anti-depressants. I felt a little better, but was still SO, SO tired. I was also having these weird pains, in my arms, legs, hands and feet. I would get episodes of my heart racing, even if I was just laying on my bed watching TV. I noticed that sometimes my eyelids would twitch a lot, I was getting headaches more frequently, I felt very tired during the day yet had a hard time sleeping at night, and I was becoming very forgetful. Over all I just felt very unwell. After several more trips to the doctor and blood work coming back “normal” I decided to do some research for myself. There had to be an explanation as to why I felt like an old woman at the age of 28.

I started searching for my symptoms and the first website that came up was http://www.parathyroid.com. Which is a website dedicated to people with parathyroid disease. I had a lot of the symptoms and I immediately suspected this could be my problem. Based on what I learned from the website and looking back on past blood work, I asked my doctor for the test.

Sure enough I had parathyroid hormones that were higher than the normal range. Although my calcium was still considered in the normal range, it had gone up again. When I had looked back on my past blood work it was steadily going up, which is not normal! They also include teenager levels in the normal range, teenagers naturally have higher levels of calcium. So even though my level was in the normal range for ALL people, it was not a normal calcium level for someone my age.

My doctor immediately referred me to an endocrinologist, and we received great news that we were moving back to Florida. But while I was waiting for my appointment to see the endo something happened. I woke up one day with pain on the right side of my abdomen. It was so bad I could barely walk up the stairs to my bedroom. My husband came home and took me to urgent care. They feared it was my appendix and sent me to the emergency room. But it was not my appendix. After a ct scan and lots of ultrasounds I was informed that I had a dangerous blood clot, and that I was lucky my husband brought me in. I ended up staying in the hospital for 3 days. They were pumping me full of pain medication and blood thinners. They told me that in order to go home to my family, I would have to be able to give myself shots in the stomach, until the blood thinner pills became therapeutic. If I could not do the shots I would have to stay in the hospital. Well I needed to get home to my kids, so shots in the stomach it was! I was also visited by the endocrinologist while I was in the hospital who told me he was pretty much certain I had a parathyroid adenoma and he ordered a 24 hour urine test to be done while I was there. I later found out that calcium is involved in the blood clotting process and this could have been a coincidence but was most likely related to the parathyroid disease. It can manifest itself in so many evil ways.

I ended up having to give myself the shots in the stomach twice a day for 3 weeks. It was not easy… my stomach was bruised all over, the medication burned so badly and caused painful lumps to form under the skin. I had to go several times a week to have my blood tested. All of this was very difficult with how crappy I was feeling, not to mention I had a child in kindergarten and an infant, and my husband and I shared only one vehicle. I had an MRI a couple of weeks after being released from the hospital to be sure that the blood clot was gone and thankfully it was.

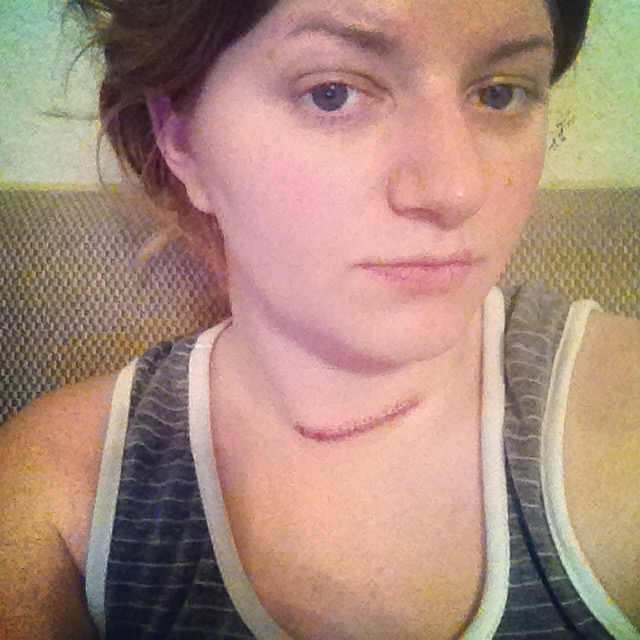
We made it to Florida safely after driving for 12 hours two days in a row. The kids were surprisingly well behaved in the car and we were able to see some family on the way. We got settled in and I found a doctor and endocrinologist who accepted my new insurance (which was no easy task). After an ultrasound of the neck and a sestamibi scan, he was unable to find an adenoma but said that I most likely had hyperplasia of the parathyroid glands because they looked enlarged on the ultrasound. He referred me to a surgeon for a parathyroidectomy. This is when they removed 3 1/2 of the glands, and put the remaining 1/2 in another part of the neck or even the arm in case the problem returns and an additional surgery is needed.

Please keep in mind that during all of this time, I was still in a lot of pain and so tired. It was so bad at times that even the thought of moving/lifting my own arms seemed exhausting and impossible. I used to look forward to my hot showers as it was the only quiet time I had during the day, now I thought that it just felt like too much work. Too much work to take a shower or lift your arms?! Ridiculous I know but that is how draining this disease is.

I arrive at the hospital at 5 am on the day of my surgery (less than two weeks ago, at the time of posting this) I was SO exciting thinking “I am going to be cured, and feel sooo much better. No more brain fog, no more pain. I will be a better mom to my girls again, have the energy to bake and take/edit pictures, work on my blog, go to the farmer’s market” and so on.

Sadly, that did not happen.

I have heard stories of some people waking up from their operation and immediately feeling like a million bucks, but others take longer to start feeling better. I figured I was just one of the ones who would take a while. My aches and pains were not there… which was amazing! But I still felt run down. My nurse did not really give me much info about what happened with my surgery and the doctor was in SUCH a hurry to leave he did not bother to come check on me. I was able to go home the next day, luckily the pain was minimal… but it felt like someone was squeezing my throat (from the swelling).

Parathyroid Surgery
Parathyroid Surgery

8 days after surgery and I was still not feeling better. I had an appointment to get my stitches removed. The gentleman who removed them was in the operating room during my surgery. I asked him some questions about what happened, and for a copy of the pathology report.

They had taken me into surgery TWICE. My parathyroid hormone level dropped at one point, but was never low enough to be in the normal range. The next day, not only were my hormone levels back up, but they were higher than they ever were before surgery!!! My calcium was down, but with the high parathyroid hormone it will just come right back up. The Surgeon removed my 2 left glands, which appeared normal (so I am not sure WHY my endocrinologist thought I had hyperplasia or WHY the surgeon still removed them upon seeing they were normal) He left a normal looking gland on my right side and “could not locate” the other right gland…. which is probably the bad one that needs to come out. I am very confused by what he did… removing two normal glands and leaving another. Not finding the other gland, did he even look that hard?! This surgeon had fantastic ratings and reviews, I honestly don’t see how because he didn’t seem to care about the patient at all in my case. So here I am… still healing from surgery. A surgery that was for nothing. I am not cured.

Parathyroid Surgery - 8 days post-op
Parathyroid Surgery – 8 days post-op

The longer you have this disease, the worse it makes you feel, and the more damage it does to your body. If left uncured it can lead to other very serious and deadly health problems. Including but not limited to heart attack, stroke, calcification of kidneys, and different cancers. It even says on http://www.parathyroid.com that this disease does cut people’s lives short.

When it hit me that I am not cured I could not stop shaking. I am just going to feel worse and worse again (and have started to)…. I am now determined to get to Tampa General, they have a wing dedicated to ONLY parathyroid surgeries. The top parathyroid surgeons are there, they do thousands of these operations a year with a very high cure rate. They are the ones who created the website http://www.parathyroid.com. People from all over the world go there to see them. I am not sure if I would trust anyone else to operate on my neck again, especially since re-operations have more risks (Such as nerve/vocal chord damage).The only thing stopping me is money. It is very expensive but I NEED to get better for my wonderful girls, my husband and my family. My mom created a fundraiser to help me get there:

http://www.gofundme.com/ashleyneedsacure

Please share this link, and please help if you can. Even $1 would get me closer to my goal. I really appreciate any help. I want to be able to enjoy life, keep up with my kids, and I want to be able to continue this blog. But first I have to get better. Please keep an eye on your calcium, especially if you have any of these symptoms. Thank you so much for reading 🙂

❤ Ashley

10697309_10152821579853917_4219530600507902107_o IMG_2188 parathyroid disease awareness ribbon

Uncategorized

New Addition


New Addition

Our new family member ❤ This little beauty was born October 2013. Last year I had a high risk pregnancy and other health issues at the same time, and now I am very busy with two little ones and still dealing with a couple of the health issues. I really appreciate all of the views and comments and I have been trying my best to respond when I can. I know I have been majorly slacking with this blog, and I am sorry… But I have some ideas that I can't wait to try and recipes I can't wait to share. I hope to get back into the swing of things soon 🙂

Crafts/Fun Recipes

Homemade (Washable) Sidewalk Paint


Homemade Sidewalk Paint Recipe

I have seen a few posts on Pinterest about homemade sidewalk paint, so of course I had to make some myself. Most recipes I came across said to use water, cornstarch and food coloring. I really didn’t like that idea, food coloring stains SO easily! So after a little researching I noticed some people saying they used non toxic washable paints instead. (I like this kind by Crayola) If you have young kids you probably already have some laying around anyways! Yes they sell washable sidewalk paint but it is more expensive for just a few colors. Why not make your own? It is cheaper and so easy! My daughter had a blast helping me mix everything together 🙂 I did not see any exact measurements for using washable paint, only to use equal parts water and cornstarch. So I just decided to experiment and I think it came out great! See how bright they are?!

Homemade Sidewalk Paint Recipe

Ingredients for each color:

  • 1/4 cup cold water
  • 1/4 cup cornstarch
  • 1 tbsp washable paint
  1. In a cup, stir 1 tbsp of paint into 1/4 cup of cold water
  2. Slowly add in cornstarch while stirring water/paint mixture

That’s it!

You could probably just stir with paint brushes but since I didn’t feel like digging up that many I just used popsicle sticks I already had in the kitchen. Adding the paint to the water first makes it easier to incorporate. Some people just put everything in a jar and shake it up. If I had extra jars I probably would have done that because we have some left over and the jars would be perfect for storing it for next time!

You will need a brush with rough bristles that holds a lot of paint. I bought the one in the picture below at Michael’s craft store. It was only a couple of dollars for 3 of them and they were perfect for this! The handles are also thick and easier for little hands to grip. These or these brushes also look like they would be perfect!

Homemade Sidewalk Paint Recipe

Beware of hot pavement, if you have a shaded area that would be best. Now take those little bits outside and have some fun! If they get messy just hose them off! 🙂

Homemade Sidewalk Chalk Recipe

Food Recipes

Homemade Taco Sauce


Homemade Taco Sauce

Happy Cinco De Mayo! What better day to share this recipe? 🙂 This is incredibly easy and probably the best taco sauce I have ever tasted. The best part? Nothing nasty added in, like preservatives. My five-year old was licking this off of her plate tonight at dinner lol. I found the original recipe here but I did not follow it exactly.

Here is what you will need:

  • 1 cup tomato sauce (I used organic)
  • 1/4 cup water
  • 1/4 tsp chili powder
  • 1 tsp cumin
  • 1/2 tsp garlic powder
  • 1/4 tsp salt
  • 1/4 tsp paprika
  • 1 tbsp white vinegar

Combine all ingredients in a small saucepan, whisk together. Cook on medium-low heat for 15-20 minutes, whisking occasionally. That is all, could not be easier! This is a very mild sauce, if you want to make it spicier you could add more chili powder, maybe some cayenne or red pepper.

This sauce would probably be even better made a day in advance so the flavors have more time to meld together. Store in the fridge.

We had it on homemade Mexican pizzas tonight, YUM!

Mexican Pizza


Enjoy!

❤ Ashley


Uncategorized

Taking A Break


I just wanted to let you all know that I am still here! I have been sick lately and have also been dealing with an old injury that is acting up. I have to have a procedure done on my right eye tomorrow. I probably will not be doing another post for a little while, but I will be back! 🙂

Beauty/Body Recipes, Tips & Tricks

Homemade “Vaseline”/ All Natural Non-Petroleum Jelly


Homemade "Vaseline"/ All Natural Non-Petroleum Jelly ~ Ashley's Homemade Adventures

I was inspired to make this because my husband’s hands are so dry and cracked this winter. Coconut oil healed the little cuts, but his skin is still super dry. He doesn’t just need a moisturizer, he needs something to protect his skin as well. What would most people turn to in that situation? Good ole petroleum jelly. Problem is, I don’t have any and haven’t for a long time. When I read about some of the dangers I threw it out. It can easily be contaminated and is a possible carcinogen. Cancer causing slop? No thank you! I don’t want that stuff anywhere near my family ever again. On top of that it does not even moisturize at all and can actually prevent your skin from getting rid of toxins. It is even banned in some other countries! It is amazing how many products I used to use all the time without even thinking about WHAT I was using, and many other people are the same way. Of course now I am always checking labels lol. Anyways I knew there had to be a better way, and luckily I found one! This recipe is for homemade non-petroleum jelly. I was even able to simplify it a little more and make mine totally organic! It could not be any easier 🙂

Ingredients:

  • 1/8 cup (about 1 ounce) beeswax (I used organic beeswax pastilles)
  • 1/2 cup olive oil (I used organic olive oil)

Pour your ingredients into the same jar you are going to be using to store it. Place the jar into a saucepan and add enough water to go about halfway up the jar. Heat on medium until the beeswax melts. Stir, and carefully remove jar from pan – I am sure it goes without saying but just in case, it is HOT. Let cool completely, store covered.

I loved using the same jar to store it in, because there was no clean up afterwards! I always have popsicle sticks on hand because we love to make our own, so I used one of those to stir. Literally the only thing I had to do was dump the water after I was done. You could even let it cool completely and use it to water your plants. It only takes a few minutes for the beeswax to melt so keep an eye on it. I would not recommend boiling the water because the jar might tip and spill. This only fills a small jar so if you want to make a large amount use a bigger jar and double the ingredients.

I actually made two jars of it, and while one was cooling I stirred some essential oils into it to make a natural antiseptic ointment. I used about 10-20 drops each of lavender, lemon and tea tree essential oils. I will probably also use this as a base for homemade vapor rub with some eucalyptus, peppermint and lavender essential oils. Any one of these would make a great gift too!

Homemade Petroleum Jelly & Antiseptic Ointment ~ Ashley's Homemade Adventures

Enjoy!

❤ Ashley

*Edited on 04/04/19 to add: I now use 1/4 cup olive oil and 1/4 cup coconut oil to make this. I find the consistency is better and coconut oil is great for healing

Beauty/Body Recipes, Uncategorized

Homemade Shaving Lotion


Homemade Shaving Lotion ~ Ashley's Homemade Adventures

Finally an alternative to store-bought shaving cream! I have tried using plain soap or body wash (can we say razor burn?!) and also plain conditioner (worked fine but not silky enough for me) So yes I will admit I was still using store-bought, but now I can kiss it goodbye! I was using lotionized shave creme, but looking at the label makes me cringe. Sulfates, parabens, and a whole bunch of other crap I can’t even pronounce. I am so glad this homemade shaving lotion can be made without all that! Not to mention it works great and leaves your skin feeling silky smooth.

I found this recipe here but I did modify it a bit to make it more natural 🙂

Ingredients:

  • 1 cup shampoo (I used 1 cup of my homemade liquid castile soap)
  • 1 cup conditioner (I used Simply U sulfate and paraben free conditioner)
  • 5 tablespoons baby oil (I used grape seed oil)
  • 5 tablespoons lotion (I used 1/2 cup of St. Ives with natural moisturizers, but I plan on using homemade lotion in the future)
  • Essential oils (optional, I did not use any in this batch but probably will in the future)

Wisk all ingredients together, pour into a bottle and you are done! I am absolutely in love with this stuff and never plan on buying any chemical laden shaving cream from the store again! I store mine in a pump bottle, which makes it super convenient. Enjoy!

I will leave you with this bonus tip… Dry your razor blades off when you get out of the shower. They will last longer, seriously! 🙂

❤ Ashley

Food Recipes

Homemade Chia Seed Pudding


Chia Seed Pudding Recipe - Ashley's Homemade Adventures

I know most of you hear “chia” and think “Ch-ch-ch-chia!” but this seed is good for so much more than growing “wool” on a cute clay lamb. I recently bought a pound of chia seeds because I heard about the many health benefits. It contains essential fatty acids, protein, fiber, iron, magnesium, antioxidants and many other nutrients our bodies need. You can read about the many other wonderful benefits of chia seeds here. After buying the seeds admittedly I had no idea how to use them. I did a quick search and one of the first things that came up was 10 Uses for Chia Seeds by the Wellness Mama. She has a wonderful recipe for chia seed pudding and says her kids love it (the seeds soak up the liquid and gel up). I decided that is what I wanted to try first, since it sounds like something my daughter would like as well. I decided to try her strawberry version since I had just bought some fresh strawberries (although the chocolate recipe sounds heavenly as well and we will be trying that next!) Here is how to make the strawberry recipe:

  • 2 cups milk (we use almond milk)
  • 1/2 cup chia seeds
  • 1 cup fresh strawberries (about 6 large strawberries)
  • 1 tbsp honey

Place all ingredients in blender and blend until smooth. Transfer to bowl and chill in fridge. It takes about 10 minutes to thicken up to the right consistency. I personally think it is better if you let it sit for a few hours, the outside of the seeds will soften up more so it feels smoother.

Chia Seed Pudding

I know it does not look all that pretty but wow it is good! It tastes so creamy and strawberry-y 🙂 There are so many combinations you could dream up! I am so glad I decided to try this, I love it and my daughter does too.

The only downside is cleaning the blender, some of the seeds will get stuck. I just used the hose attachment on the sink to blast most of them out. Then I filled my blender halfway with water, added a drop of dish soap and used the cleaning cycle to get the rest out. I hope this will not keep you from trying this recipe, it is so worth the few extra minutes of clean up. It is so good for you and the chia seeds will also help keep you full!

Enjoy!

❤ Ashley

Beauty/Body Recipes, Drinks, Tips & Tricks

Homemade Electrolyte Drink (Homemade Pedialyte)


Homemade Pedialyte Recipe - Ashley's Homemade Adventures

The flu is going around like crazy! We have been dealing with it in our house for several weeks now. My daughter and I are past the worst part now, thank God! There was one day we were both very weak with very high fevers. I was so happy I had made some of this homemade Pedialyte the day before. This is a great way to save yourself some money and a trip to the store. You can also flavor this any way you want! I know there are quite a few recipes out there but this is how we do it:

Homemade Pedialyte:

  • 8 cups water (I prefer to use distilled water, I always have some on hand)
  • 1/4 cup honey (you can also use sugar but we try to stay away from extra sugar and the honey has added benefits)
  • 1 teaspoon SEA salt (contains important minerals that table salt does not, you could also use Himalayan salt which would be even better)
  • Juice of an orange, lemon or lime (optional but has even more benefits, like Vitamin C)
  • Crystal Light or Kool-aid powder for flavor (also optional, we love the lemon Crystal Light with Stevia)

Combine all ingredients in a pitcher, stir until salt and honey have dissolved. Store in refrigerator.

We also love to make this into popsicles, great for when you or your child is burning up from a fever. When my daughter is sick I make sure she takes a sip of this every 10 minutes or so. Best served chilled.

Warning: Honey is not considered safe for children less than a year old.

~~~~~~~~~~~~~~~~~~~~~~~~~~~~~~~~~~~~~~~~~~~~~~~~~~~~~~~~~~~~~~~~

Also a quick update on my cousin Joe… (I mentioned in the First Birthday post about how he had a massive heart attack) Miraculously he has no serious brain damage, his heart is working on its own and it looks like he will be okay! He still has to get through heart surgery on Thursday so he is a long way from full recovery, but I am just so happy and thankful he is still with us. If anyone could send some positive thoughts or prayers his way I would really appreciate it 🙂